Panocle User Guide
Welcome to your comprehensive guide for using Panocle AI smartglasses. This guide will help you get the most out of your revolutionary AI-powered eyewear.
Getting Started
Download Panocle AI app from Play Store or App Store and follow the instructions on the app.
*iOS version coming soon. Stay tuned for updates!
Panocle Components
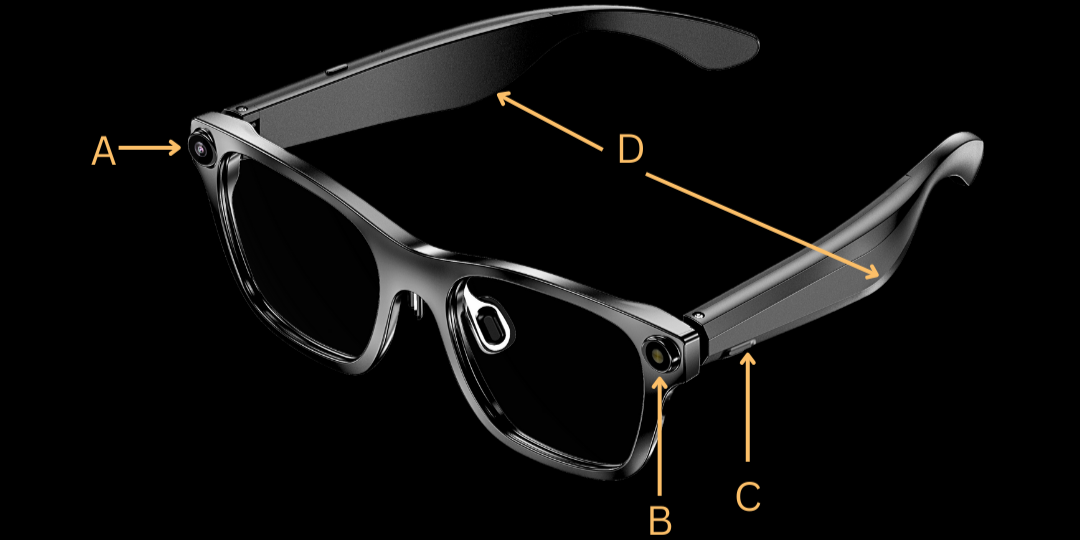
Camera
Located on the top right corner of the right lens frame when Panocle is worn
Photo Prompt Light
Located on the top left corner of the left lens frame
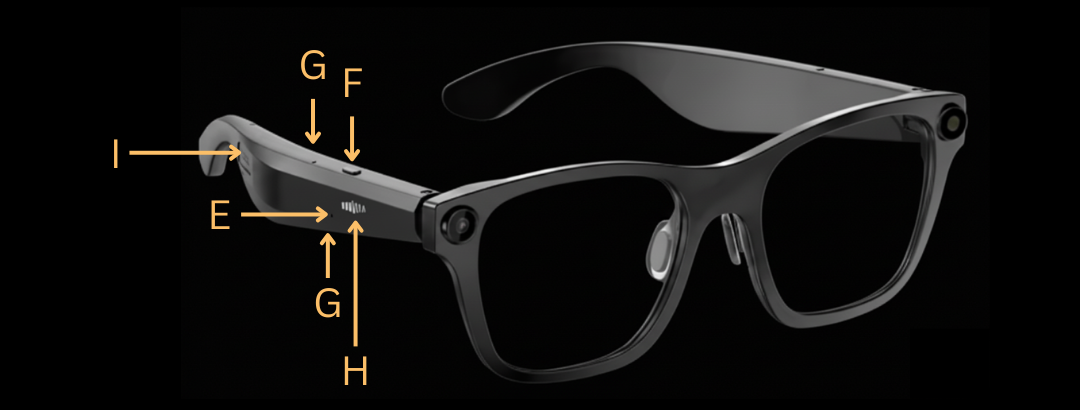
Power On/Off Button
Found on the underside of the left arm, near the hinge
Speaker
Two speakers, one on the underside of each arm, positioned towards the ear
Status Prompt Light
Located on the bottom outer side of the right arm, beside the touchpad
Physical Button
Situated on the upper side of the right arm, further back from the camera
Microphones
Positioned on the top and bottom side of the right arm, further back from the physical button
Touchpad
A rectangular area on the outer side of the right arm, beneath the physical button
Charging Interface
Located on the outer side of the right arm, near the ear
Power On/Off
Power On
Move the sliding switch forward
Power Off
Move the sliding switch backwards
Charging
Panocle is equipped with a magnetic charging interface. When you bring the charging end of the charging cable close to the charging interface, it will align and magnetically attach itself.
The USB end of the charging cable can be attached to a 5V wall adapter or equivalent USB output.
During charging: Status indicator light will turn red
When fully charged: Status indicator light will turn blue
Status Indicator Light
Not Connected
The status indicator light flashes blue until connected
Connected
The status indicator light stops flashing and shows a steady blue light
Shutdown
When the device is shutting down, the status indicator light flashes twice with a red light
Music Controls
Play/Pause Music
Double-click on the touch area
Adjust Volume
Slide up to increase volume, slide down to decrease volume
Next Track
Tap the touch area three times
Photo & Video Controls
Take Photo
Short press the right physical button once
Record Video
Long press the right physical button for 2 seconds
Audio Recording
Double-click the physical button
End Recording
Short press the physical button once
Note: A privacy light will glow during recording. First connect to the app before taking photos/videos.
AI Assistant
Activation
Place a finger on the touch pad until a sound is played
Interaction
Once the sound is played, ask any question within 5 seconds
Call Controls
Answer/Hang Up Call
Short press the physical button once
Reject Incoming Call
Double-click the physical button
Warranty Information
12-Month Limited Warranty
Items are covered by a 12-month limited warranty against manufacturing defects from the date of purchase.
What's Covered
- ✓Manufacturing defects
- ✓Free repair or replacement
- ✓Free shipping anywhere in India
- ✓Free pickup of defective unit
What's Not Covered
- ✗Damage from misuse or accidents
- ✗Unauthorized repairs
- ✗Normal wear and tear
- ✗Consumables
The warranty is subject to applicable Indian consumer laws.